Besto: Basil Pesto

Image

One of my favorite things about basil pestos is that you kind of have to get to know them to love them. Green and somewhat slimey, they aren’t the most estetically pleasing of sauces; it is easy to see how a stranger to pesto could be apprehensive. However, a good pesto can sweep you off your feet at first bite.

Pesto is kind of en vogue right now, I’ve seen a bunch of recipes I’m interested in trying for pea pestos or sun-dried tomato pestos. This recipe is for a basil pesto, and I think it is a lip-smacking good recipe. I’ll tell you quickly, about how I came up with the name:

I was plating dinner and my younger brother asked me what I was eating (Tangent: he is EXTREMELY picky. The last green thing he ate was probably mint chocolate chip ice cream… I’ll be made the next pope before he eats pesto). My response was, “Pesto, but its really good pesto. The best pesto! Wanna try?”

His response was simple, “So its Besto?” So it’s Besto now. And no, he wouldn’t try it. Don’t let that put you off; he doesn’t even like mashed potatoes… So yeah, he’s that picky.

Now for the good stuff:

One of the reasons I really like this recipe is because it incorporates both basil and parlsey. I’ve tried a lot of pesto recipes, most of which called for either basil or parsley, but not both. Using both gives a much stronger and multi-layered flavor. As you can see, I have listed the ingredients and instructions at the bottom, but this recipe is one you can kind of do by sight and taste. I like to use a 2:1 ratio of basil to parsley. I like to think of it in proportions because that’s helpful if I am serving more people and hence need more sauce.

On the subject of nuts: I’ve used both walnuts and pine nuts. I prefer pine nuts, I like their distinct nutty and sweet flavor, but they can be expensive. Using walnuts still gives your pesto a great nutty flavor, but is a little more fiscally conservative (plus I had them in the house already).

Surprise ingredient: Lemon. I’m not sure if I’ve mentioned this before, but I really believe that lemon is like Viagra for cooking. It gives almost everything a little extra oomph! I use both the juice and the zest. I don’t aim for the pesto to have a strong lemon flavor, but I’ve found that lemon works really well in building a great flavor.

I like my pesto punchy. It should have a strong aroma, be bright green and smack your taste buds around (just a little).

Also, this sauce is very versatile. I made it with pasta, but you can serve it with chicken, in a panini, on pizza and I’m sure a multitude of other fun ways.

So please give it a try! I’d love to know how it turns out.

Happy Eating 🙂

2.5 oz Basil

.5 oz Parsley

3 or 4 cloves of Garlic, chopped

Walnuts, chopped (a big handful)

1 tbsp Pecorino Romano cheese

1 Lemon, juiced and zested

1 or 2 tsps Salt and Pepper

3-4 tbsp Extra Virgin Olive Oil

1. Blitz basil and pesto in food processor. Once they are finely chopped, add chopped walnuts and garlic, blitz again.

2. Add lemon juice and zest, blitz. TASTE!!!! Think about the flavor and consistency.

3. Add salt and pepper, blitz. Taste again (important). Add more seasoning if needed.

4. Add olive oil, blitz. You want to be careful here, because you want the sauce to be loose, but not too loose. Add oil in intervals if you feel apprehensive.

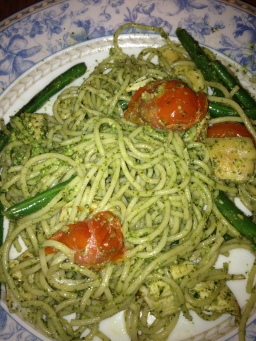
Serve any way you like! 

Black Bean Soup

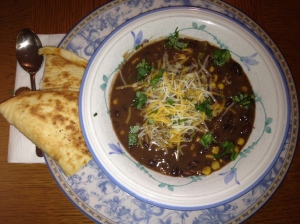
Black Bean Soup served with a Cheese Quesadilla.

Black Bean Soup served with a Cheese Quesadilla.

When I troll the internet for recipes I generally stick to what I know. Something that I’ve tried before or at least something that I know what I’m aiming for when it comes to seasoning. I’m a big fan of tweaking recipes to your preferences, but I don’t like to give recipes a complete facelift, unless I am reasonably confident in what I’m doing.

I love black beans. Love, love, love them! I also love Mexican food. I could eat it every day and my love for it would only grow. I had heard lots of good things about black bean soup, but had never had it myself. That would generally make me hold off on making something…. though it was going to take more than “not knowing what I’m doing” to keep me from taking a swing at this meal. Since I never tasted black bean soup before, you might be wondering, “How did she  know which recipe to pick?”

I didn’t. I took a wild leap of faith and decided to go with Progresso’s recipe. It can be found on the back of their can of black beans (I posted it below for you anyway). I ended up liking the soup very much and have every intention of making it again in the future. I was not 100% happy with the flavor profile though. I should really go out and order black bean soup so I get a better idea of how the professionals do it.

If you have read some of my other posts, then you know I have intense issues with cumin. I did go out and buy some (reluctantly). I staunchly believe that sometimes you have to use seasonings you don’t love to help build amazing flavors. Example? Indian curries! I love ‘em. Do they have cumin in ‘em? You betcha! Can I taste the cumin? No. Is the cumin doing something to build that flavor? Absolutely. So, without any more ado, I halved the amount of cumin in this recipe.

I also did not add carrots (you gotta go with you gut, and my gut wasn’t in the mood for carrots) or salsa (forgot to buy it). I was a HUGE fan of the corn in the soup. Apparently corn is not usually in black bean soup, but it was definitely my soup’s MVP (after the black beans, of course). The corn added a nice texture and little hint of sweetness. I strongly recommend giving it a try.

Lastly, this recipe called for a lot of chicken stock. I only added about 3/4 of what the recipe called for because I didn’t want to dilute the flavor of the black beans too much. I don’t think adding the remaining stock would have made an improvement, for me, taste wise.

I also garnished my soup with some chopped cilantro and a handful of shredded Mexican blend cheese. If you give it about 30 seconds, the hot soup will start to melt the cheese. Swirl the half melted cheese into your soup and then enjoy (As if you’d have any other choice)!

I served my soup with a simple cheese quesadilla. This was my play on soup and a sandwich. Dip the quesadilla in the soup and I promise it will make you the happiest of campers. Oh my yum!

Let me know what you think. I’d love to hear alternative seasonings for the soup.

Happy Eating 🙂

1 Tbsp olive oil

1 large onion,
 chopped

1 medium stalk celery, chopped (1/2 cup)

2 medium carrots, chopped (1 cup)
 (I didn’t add any carrots)

4 cloves garlic, chopped

2 Tbsp chili powder

1 Tbsp ground cumin
 (I used half a tbsp)

1/4 tsp pepper

3 cans (14 oz each) chicken broth (I used 36 oz of chicken broth)

4 cans (15 oz each) black beans, drained, rinsed

1 can (15.25 oz) whole kernel sweet corn, drained

1 jar (16 oz) mild picante or salsa (forgot to buy some)

  1. In 4-qt saucepan heat oil over medium-high heat.
  2. Cook onion, celery, carrots and garlic in oil 5 min, stirring occasionally. Add chili powder, cumin and pepper, cook 1 min.
  3. Stir in broth, 2 cans of the black beans and the corn. Heat to boiling, stirring occasionally.
  4. Meanwhile, place remaining 2 cans black beans and the picante in blender or food processor. Cover and blend on high speed until smooth. Stir into boiling soup mixture.
  5.  Reduce heat to medium; simmer 15 min. Serve with chopped cilantro, if desired.

Dinner Party: Lemon Chicken and Mashed Cauliflower

Image

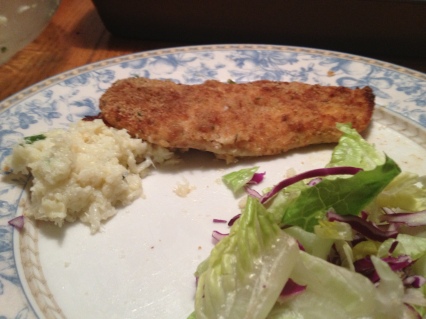
Lemon Chicken, Mashed Cauliflower and Salad

I love having people over for dinner. It allows me to do 3 of my favorite things: 1) Eating 2) Cooking and 3) Socializing.  I consider the best barometer of dinner party success to be how clean your plates are… and washing up was a breeze.

I had my friends bring nibbles and wine. We had homemade spinach and artichoke dip (PHENOM.) and homemade hummus with veggies. I hope to be the proud owner of both recipes very soon. I’m going to have to put the spinach and artichoke dip recipe in some sort of vault where it can only be accessed on special occasions… I can eat the stuff by the pint, which unfortunately causes strain in the relationship between me and my jeans. That is a sacred relationship, which I try not to stretch too frequently.

As for entrée I made lemon chicken and mashed cauliflower accompanied by some bread and salad. I have been making some variation of lemon chicken for a few years now. I can’t remember where I found the recipe, but I am immensely thankful for whichever website brought us together. Even more thankful is my hippopotamus… err I mean my cat, who probably ate more chicken than I did (she is very spoiled).

The cauliflower was really good too. I saw it on Pintrest a few weeks ago and have been obsessing over it. It was not a let down. My only complaint is that I don’t think one head of cauliflower is enough for 4 people. I would definitely make 1 and a half heads of cauliflower for 4 people in the future. As a testament to its tastiness, I forgot to take pictures before we ate (distracted by my stomach).

Just before I began to clear up, I noticed my Iphone sitting idly by my plate and scraped the remnants of the cauliflower and an extra piece of chicken together for an impromptu and somewhat lackluster photo op. So please use your imagination and pretend that there is about twice as much cauliflower on that plate!

I served this meal with a basic salad and some bread. I’m going to post about dessert separately, because it [dessert] was a beacon of deliciousness and deserves its own post (maybe even 2 posts!)

Happy Eating 🙂

Lemon Chicken

3 Chicken breasts (sliced in half vertically)

2 Lemons, juiced and zested

3 tbsp butter (melted)

2 tsp garlic powder

salt and pepper to taste

bread crumbs

1)   If you have thick chicken breasts either slice them in half . If you are using thin chicken breasts then skip to step 2.

2)   In a bowl, combine the lemon juice and zest with the melted butter, garlic powder and salt and pepper. It is easier to juice the lemons if you roll them on the counter first (trust me).

3)   Liberally dip the chicken in the lemon mixture and then coat with breadcrumbs.

4)   Line chicken breasts in a baking dish, spoon leftover lemon mixture on top and bake in the oven @ 350F for 45-50 minutes.

**Note: I recommend having plenty of leftover lemon sauce to spoon over chicken. Sometimes I’ll make a second batch just for this purpose.

Beef and Black Bean Nachos

Beef and Black Bean Nachos

Beef and Black Bean Nachos

This is a personal favorite of mine. Its delicious, fast and most importantly is a breeze to clean up. I hate recipes that put everything but the kitchen sink in my kitchen sink. This recipe is also really versatile: great nibbles for a party or tasty-yet-no-effort-dinner.

Usually, I use one of the premade spice mixes you can buy in the supermarket, however this time I made my own spice mix. I read on Pintrest that a lot of the store bought spice mixes are high in sodium and some contain silica. I can’t say for certain that its true, but I also can’t prove it isn’t. Either way, the pin included Rachel Ray’s recipe for taco seasoning, which was easy enough to make (its cheaper too!). I adjusted it slightly to suit what is in my cupboard and also because I have a love/hate relationship with cumin (I know I need to bite the bullet and make peace with cumin, but today just was not that day).

Results? Amazing! I don’t say that lightly. All the flavors were there and overall my nachos were way less salty than usual. I really enjoyed making my own spice mix; I even have some extra for next time. Also, each time I make it I can opt to add more or less of a certain seasoning to suit my mood.

Another great way to control your nacho munching experience is with your choice of tortilla chip. This time I went with an organic blue corn chip (another first for me). I liked it. I would say its main contribution was aestethic, as it didn’t make much of an impression for the better or worse taste wise. Calidad tortilla chips, however, are my personal favorite. I’ve only seen them in Target, so I’m not sure how many supermarket chains carry them. They are thicker than most of the tortilla chips I’ve tried and have a slightly stronger taste. I strongly recommend them, but any tortilla chip will do.

Optional Additions?

Jalapeno! I like jalapeno slices on my nachos. Just a few, sprinkled on the top: half garnish/ half spicy surprise.

Chopped Cilantro! Sprinkle some just atop the final cheese layer. Pretty and tasty.

A Squeeze of Lime! A hearty one, I might add. Add it to the beef when it is nearly finished and stir.

A side of Guac! No explanation needed. Avocados are delish, healthy and super trendy right now. All the cool kids are eating them.

Also, I use a pizza pan for my nacho base. If you don’t have one then any baking sheet will do. Line it with tin foil to dramatically reduce your clean up time. Who wants to scrub burnt cheese off of a metal tray? Not me. Who wants to throw away a ball of tin foil and clean up faster so you can watch TV after some good eats? Yes, this one is ME.

Dinner Party Update: I think I am going to make Lemon Chicken and Mashed Cauliflower (ever since I saw it on Pintrest, I have been dreaming about it). Not sure what to do for nibbles. Maybe Spinach and Artichoke Dip? Maybe Stuffed Mushrooms? Maybe something else entirely? Dessert is also a big question mark. I want to bake a cake because I want practice cake decorating. Apple Cinnamon Spice and Red Velvet (both with cream cheese frosting) are the current big contenders.

Happy Eating 🙂

1 lb ground beef (I use 93% lean)

1 Spanish onion, finely chopped

1 can black beans

½ cup Mexican blend shredded cheese

½ cup Mozzarella shredded cheese

½-3/4 bag tortilla chips

2 tbs extra virgin olive oil

My Mexican Seasoning:

1 tsp cayenne pepper

1 tsp garlic poweder

1 tsp onion powder

1 tsp oregano

1 tsp salt

1 tsp adobo

1)   Saute onion at med-high heat in a frying pan until onions are soft (~7 mins).

2)   While onions are sweating, preheat the oven to 400F and line pizza pan with tin foil. Add a layer of tortilla chips to the pizza pan and sprinkle with each cheese. Add a second layer of chips and again sprinkle with each cheese. You want more cheese on the top nacho layer, than on the bottom. However make sure you have plenty of cheese to sprinkle over the meat (or else certain family members may become upset with you).

3)   Once onions are soft and beginning to brown, add beef. Break the beef up with a spoon and mix thoroughly with the onion.

4)   When the beef is beginning to brown, add the black beans and mix thoroughly.

5)   Add the spice mix when beef is ¾ cooked (only a little bit pink).

6)   Mix frequently until beef is cooked and beans are mushy.

7)   Spoon beef mixture on top of nachos and add remaining cheese.

8)   Bake in the oven until the cheese is melted and bubbly.

Garlic and Ginger Shrimp

Image

Yum!

Most of my recipes I either learn from a friend or family member or I find them on the Internet. This is one of the few recipes that I came up with myself. It is very flavorful and very easy. The hardest part is deveining the shrimp, which is more tedious than difficult. I actually find it to be somewhat relaxing.

I put this recipe together with a friend for a dinner party. I originally served it with spring rolls as an appetizer, but I like this recipe so much that I think it can stand on its own. I like to cook meals that are inspired by Chinese flavors. I would love to visit China and get a real sense of what authentic Chinese cooking is like. Unfortunately, I have not had the opportunity to do so yet.  It would be a fantastic opportunity to learn more about Chinese flavors, Chinese culture and hopefully help improve my rice making technique too.

I have a good friend from Malaysia and she makes the most wonderful Chinese food. She has shown me how to make rice properly, but mine does not come out nearly as well as hers. I will have to keep practicing. She did give me some really good advice about making fried rice. She said that it is better to use leftover rice for fried rice because it is firmer and drier than rice that has just been prepared. I did not have the foresight to seek her rice making counsel the day before I made my Garlic and Ginger Shrimp and consequently my rice was not as dry as it should have been.

Lesson learned.

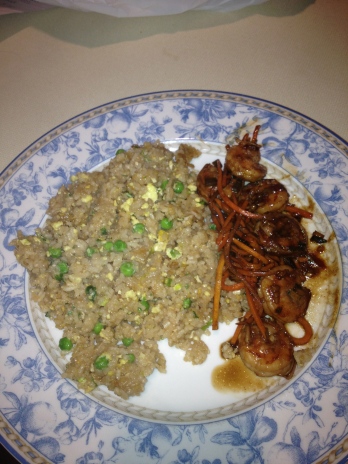
As you can tell from the picture, I paired my shrimp with fried rice and some shredded carrots. I stir-fried the carrots at the same time as the shrimp. Next time I think I will steam some vegetables separately and then make a little extra marinade to spoon over them. Shrimp cooks super fast, so I overcooked mine slightly in an effort to soften my carrots a little more. It was still very tasty, but I think I should have taken the shrimp out of the pan a minute sooner than I did.

Happy Eating 🙂

3-4 tbs low sodium soy sauce

1 tbs oyster sauce

1 inch of ginger, finely chopped

2-3 cloves of garlic, finely chopped

3-4 scallions finely chopped

1 tsp sugar

2 tsp allspice or Chinese 5-Spice

Optional:

1 chili, finely chopped or

1 tbs chili garlic sauce

½ lbs shrimp, cleaned and deveined

1-2 tbs extra virgin olive oil

1)   In a medium bowl combine all the marinade ingredients together. Taste a tiny bit on your finger. Adjust seasoning if necessary.

2)   Clean and devein the shrimp if necessary. Mix shrimp in the marinade and allow to sit for about a half hour.

3)   Heat olive oil in a wok or frying pan until it starts to sizzle.

4)   Using a spoon, scoop the shrimp out of the marinade and put into the pan.

5)   Stir-fry the shrimp for about 30 seconds before adding the remainder of the marinade.

Serve with rice and vegetables